
It's beginning to look a lot like Christmas in my little home! This year I decided to upgrade our Christmas tree from paper to fabric. I flirted with the idea of finally getting a real tree. They sell them on every corner of my neighborhood and the smell follows you everywhere. But then I remembered my newly made commitment to craft and came up with a yo-yo tree instead. It looks beautiful and gives me that wonderful sense of ownership and accomplishment that we crafters know so well.
I haven't made yo-yos in many years. My grandma taught me when I was still a little kid, when for some reason I decided I needed a top all made with yo-yos. I made the yo-yos and she sewed them together. Thinking back on it, the top turned out to be a little too intense. But grandma and I enjoyed every step of it. In Brazil, yo-yos are called "fuxico", which basically means chit-chatting. Why? Because my grandma's generation used to sit on the porch of their homes with their neighborhood friends to watch the children play, chit-chat away and make yo-yos, all at the same time! That's how easy this tree is to make! So, why not keep grandma's tradition and invite your friends for a few hours of chit-chat and craft? Then everyone will have a lovely little Christmas tree to take home and call their own.
Special thanks to Rachel, from Pins & Needles, for helping me choose the fabric and for teaching me the word "yo-yo"!
Yo-yo Christmas Tree
Choose a nice combination of assorted fabric and cut circles of decreasing diameter (approximately 1/2 inch per circle). For my tree, I cut 16 circles, on 4 different kinds of fabric, starting with a circle with approximately 12 inches in diameter, but you can choose your own tree size.

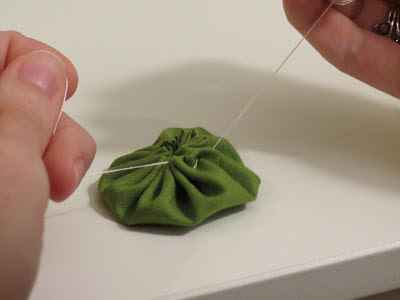
When making the yo-yos, don't bother folding the edges, as you won't be able to see them anyway once they are piled on top of each other. Fold the border just for the very last one, that will sit on top (see pictures). I find it easier to leave a long end of thread at the beginning and then lace both ends together on a not to form the yo-yo.


Find a long stick, of whatever material (I used one of these plastic sticks that are used to supports flowers), cut a small hole on the bottom on each yo-yo and just start piling them to the top! I also used a piece of cardboard to secure the stick and give more stability to the tree. You may use a piece of soap, a candle, a little clay pot... anything you find lying around. What I love the most about these types of projects is that you get to be resourceful.
For the tip of the tree, just choose something that makes you happy. I used a ribbon thinking that I could replace it when I found something else, like a little star, but now I think the ribbon is cute and makes me happy - it's a keeper! Like all my craft projects, this is a very forgiving one. So, craft, chat away and have fun!
No comments:
Post a Comment